How to Create Video with Images: From Static Slideshows to Cinematic AI Animations
Making a video from photos used to be simple - and frankly, a bit boring. You’d throw a bunch of pictures into an editor, slap on a cross-dissolve transition, add some royalty-free music, and call it a day.
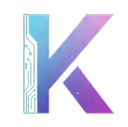
But today, you don’t have to settle for those flat, robotic slideshows. With current generative AI models, you can take a single static photo and actually animate it into a high-definition 3D clip with natural physics, realistic camera pans, and synchronized audio.
This comprehensive guide covers both methods: the cutting-edge approach of using generative AI image-to-video tools, and the classic workflow of compiling multi-image slideshows with music.
TL;DR
⚡ Quick Summary: Depending on your goal, you can create a video from images using two main approaches:
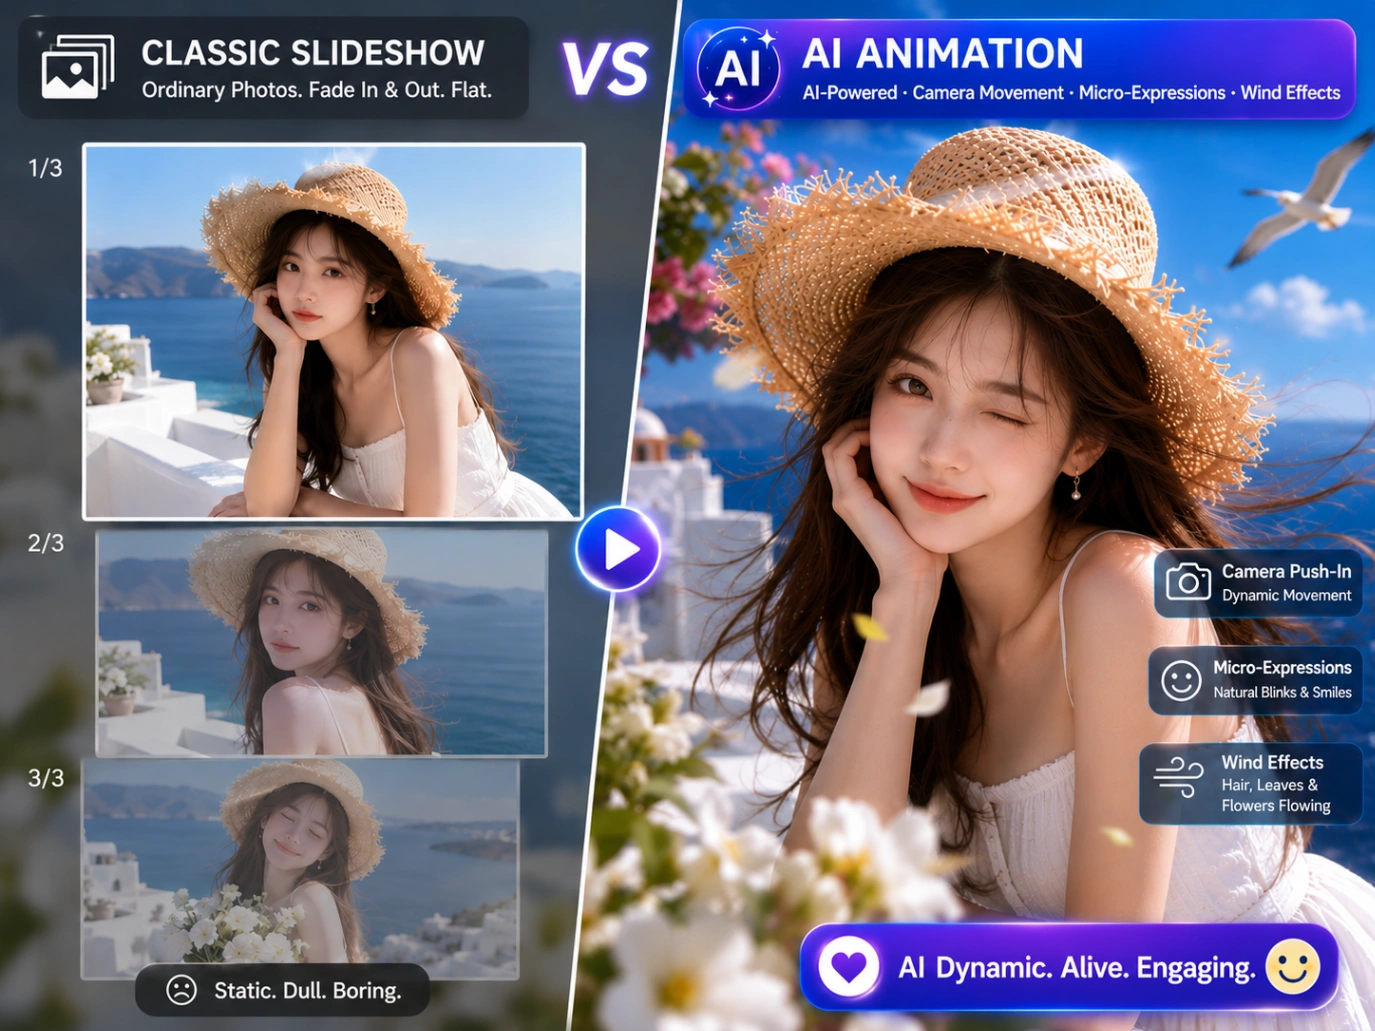
- The AI Way (For Cinematic Animation): Upload an image to generative platforms like ImageVideo AI, choose a model (such as Kling 3.0 or Seedance 2.0), write a camera prompt, and render fluid 3D motion.
- The Classic Way (For Slideshows): Assemble multiple static photos in a timeline editor (like Canva or CapCut), align image transitions with the beats of a background music track, and export.
Method 1: Animate Images with Multimodal Generative AI
If you want real 3D motion rather than flat panning, generative AI is the way to go. Early AI video tools were notorious for producing wild, unpredictable warping. Today’s models are much more controllable, letting you guide the camera path and preserve fine details with surprising precision.
Step 1: Choose the Right AI Video Model
Different AI video models are trained on different datasets, meaning some perform better on specific visual styles or production pipelines than others. On platforms like ImageVideo AI, you can access multiple industry-leading models directly:
- Kling 3.0 (Pro & 4K): The industry benchmark for high-fidelity cinematic effects, multi-shot continuity, and advanced motion control. It is highly optimized for complex camera sweeps and precise prompt-following.
- Seedance 2.0 (Bytedance): Acclaimed for producing fluid, cohesive multi-shot outputs. It excels at preserving the structural integrity of subjects and is ideal for creative character-driven showcases.
- Google Veo 3.1: Google’s flagship model, famous for handling real-world physics, photorealistic lighting, and natural audio output synchronized to the on-screen movement.
Step 2: Leverage Advanced Multimodal Controls
Modern AI video generators no longer rely on guesswork based on vague prompts. To achieve highly professional and predictable results, you should utilize the following three structured features offered by Image-to-Video AI tools:
A. First-and-Last Frame (FLF) Generation
One of the most powerful tools to prevent generative "drift" is the First & Last Frame model type (supported by Seedance 2.0 FLF, Veo 3.1 FLF, and Kling 3.0 FLF).
- How it works: Instead of uploading just a starting image and letting the AI guess the ending, you upload both a start image and an end image.
- The Result: The AI naturally interpolates the physical motion between the two images, allowing you to orchestrate exact cinematic transitions (e.g., a closed chest in frame one opening to reveal treasure in the last frame).
B. Native Audio-Visual Synthesis & Audio Uploads
Video without sound feels incomplete. When configuring your generation parameters:
- Native Generation: Toggle Generate Audio: "Yes" (supported by Kling 3.0, Veo 3.1, and PixVerse v6). The model will procedurally generate realistic environmental sounds (e.g., wind rustling, tires screeching) synced perfectly to the generated motion.
- Multimodal Audio Inputs: Models like Wan 2.7 and LTX 2.3 allow you to upload your own audio file (
wavormp3up to 30 seconds) along with your starting image. The AI will animate the image directly in response to the rhythm, tone, or speech patterns of your soundtrack.
C. Multi-Shot Storytelling
If you are generating narrative videos, standard single-shot generators can feel limiting. Using Kling 3.0 Multi-Shot (Text or Image), you can input up to 5 progressive prompts or image frames. The model processes these sequentially, maintaining consistent characters and environments across multiple camera angles.
Step 3: Design Your Camera Control Prompt
Even with advanced settings, clear camera prompting is essential. Use this reliable prompting formula:
[Subject Action] + [Environmental Details] + [Camera Movement] + [Style/Lighting]
Copy-Paste Camera Prompt Examples:
- The Cinematic Push-In:
"The character gently blinks and smiles at the camera, soft cinematic wind blowing through their hair, slow push-in zoom, volumetric sunset lighting." - The Drone Sweep:
"Ocean waves crashing gently against the rocky cliffside, realistic water foam physics, slow drone aerial pan shot, 4k cinematic detail." - The Subtle Parallax:
"Nebula dust swirling slowly in deep space, stars flickering, slow parallax camera drift, photorealistic sci-fi style."
Method 2: Compiling a Multi-Image Slideshow with Music
If you have a collection of product photos, event memories, or portfolio designs, compiling them into a structured slideshow remains the quickest way to tell a story.
Here is how you can build a clean, rhythmic video sequence using standard timeline editors.
Step 1: Storyboard Your Visual Pace
Before importing your images into any timeline, organize them chronologically in a local folder.
While a standard video plays at 24 to 30 frames per second, a digestible slideshow requires you to hold each static image on screen for 2.5 to 4 seconds. Any faster, and your audience cannot process the details; any slower, and you risk losing their attention.
Step 2: Choose Your Editor (Timeline-Based)
To combine images with music, you do not need complex desktop software. You can use free, web-based timeline editors:
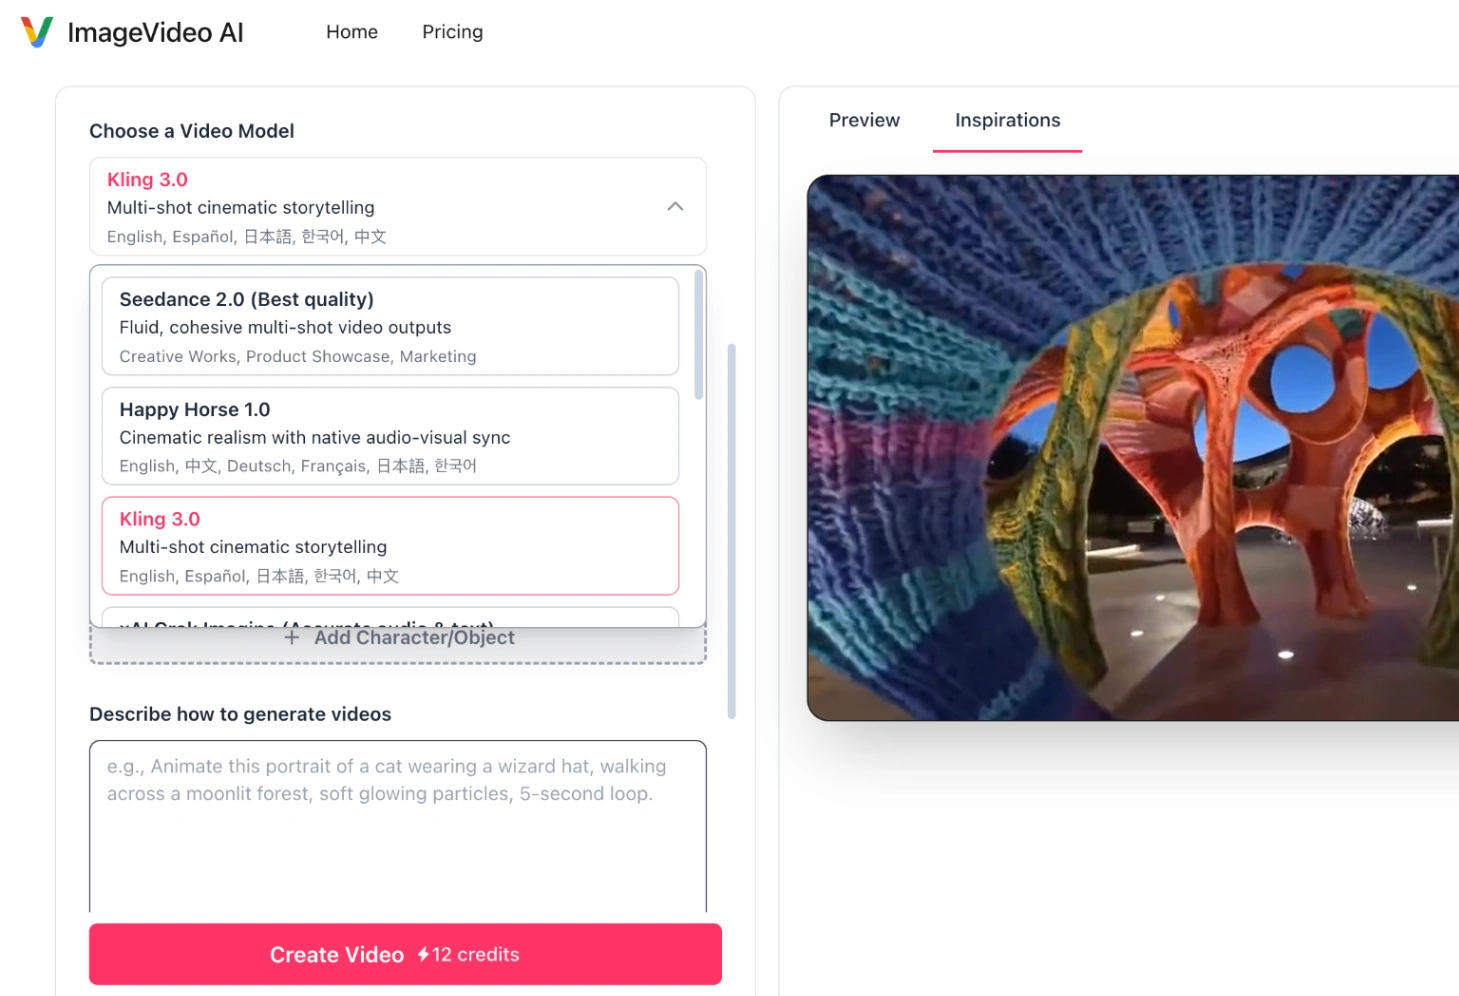
- Canva or CapCut: Best for leveraging ready-made transitions, quick text templates, and automated beat-matching.
- Adobe Express: Best for maintaining strict brand colors, clean layouts, and presentation-style transitions.
Step 3: Layer Your Audio and Edit to the Beat
To make your slideshow feel like a cohesive film rather than a random folder of photos, your visuals need to sync with your soundtrack.
- Place Your Audio Track First: Do not edit your images first and then try to stretch an audio track to fit. Drop your
MP3orWAVfile onto the timeline first to set your video’s overall duration. - Cut on the Heavy Beats: Double-click your audio track to expand the visual waveform. Look for the vertical spikes (representing drums, bass drops, or tempo shifts). Align the transition points—where one image cuts to the next—directly with these spikes.
- Smooth the Edges: Avoid starting or ending your video with abrupt audio cuts. Apply a 1-second "Fade In" at the beginning and a 2-second "Fade Out" at the final frame.
Side-by-Side Comparison: AI Motion vs. Traditional Slideshows
| Feature / Dimension | AI Image-to-Video Animation | Traditional Multi-Image Slideshow |
|---|---|---|
| Visual Output | Static elements physically move, bend, and react inside a 3D space. | Flat static photos presented sequentially with 2D transitions (fade, slide). |
| Required Input | A single image (or first & last frame combo) + text prompt. | A structured folder of multiple images + an audio track. |
| Audio Capability | Native procedural audio generation or custom audio-to-video alignment. | Manually aligned background music or voiceover tracks. |
| Best Used For | Social media hooks, cinematic ads, character animation, and dynamic storytelling. | Product catalogs, travel recaps, real estate listings, and business presentations. |
Technical Troubleshooting: Solving AI Video Edge Cases
Let's be honest: rendering AI video can get expensive, and wasting generation credits on failed runs is incredibly frustrating. To keep your workflow efficient, here is how to bypass the most common technical limitations:
Issue 1: "The generation failed due to a file size or duration error"
- The Cause: Models have strict backend API constraints. For example, Wan 2.7 reference-to-video limits uploaded videos to between 2 and 15 seconds, with a strict file size limit.
- The Fix: Before uploading, compress your reference videos to under 50MB and trim them to the supported duration. If uploading custom audio to Wan 2.6/2.7, keep the file size under 15MB.
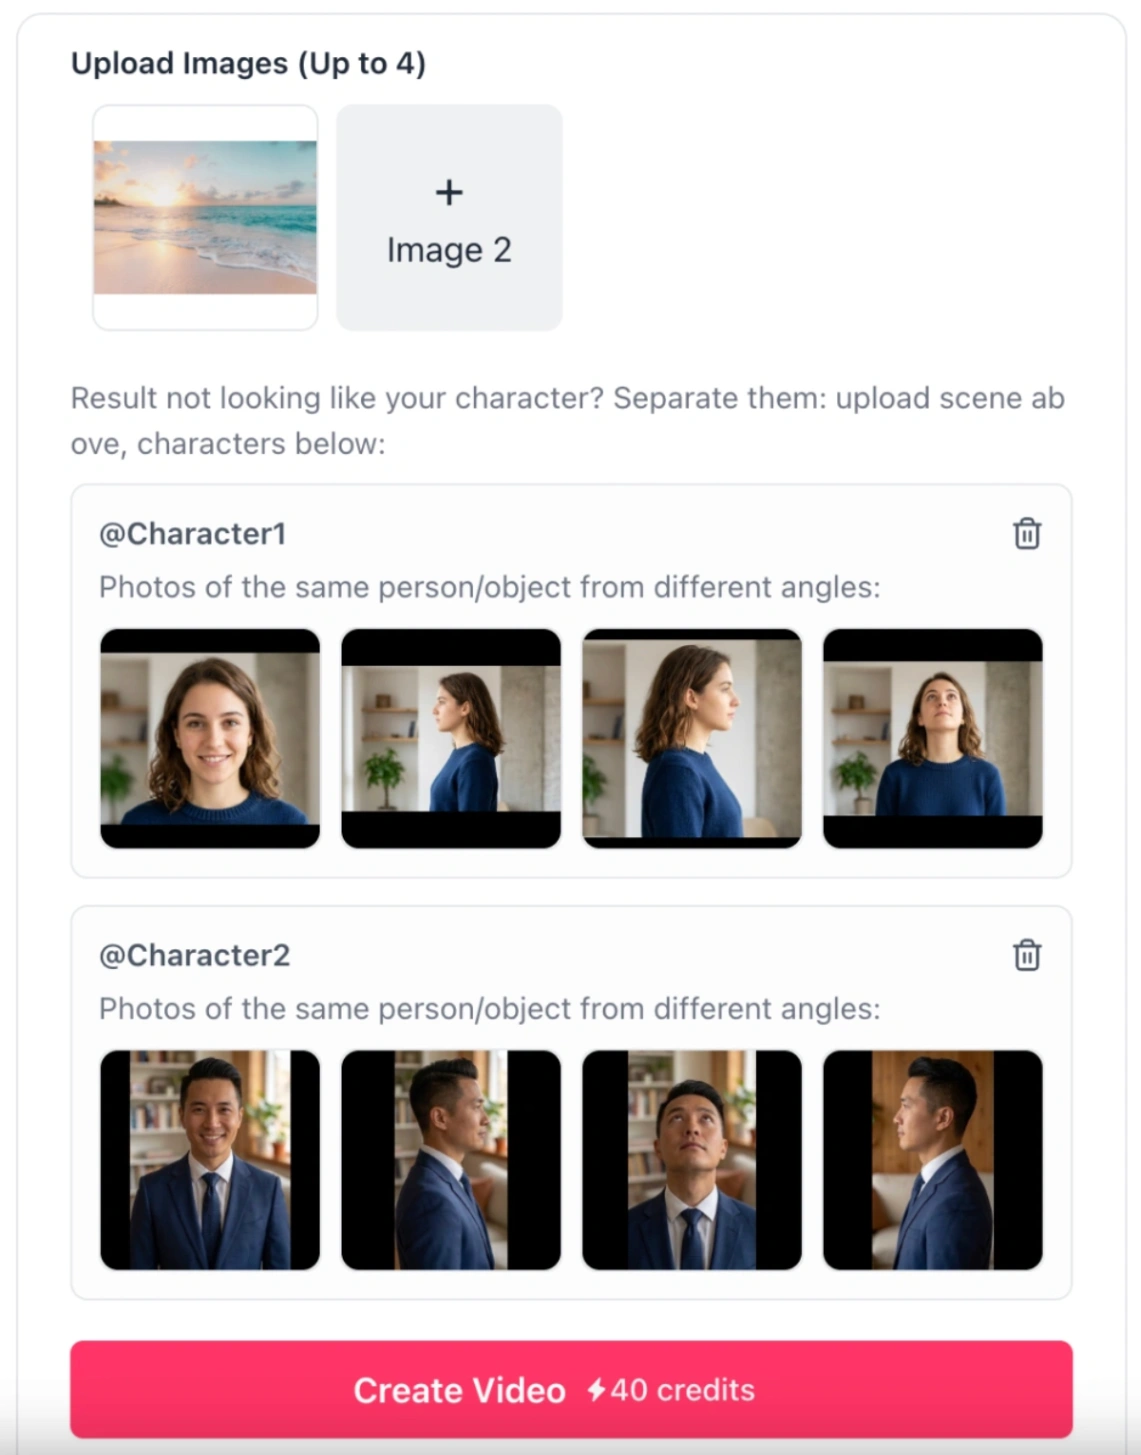
Issue 2: "My multi-character elements are merging or confusing the AI"
- The Cause: Standard image-to-video models cannot differentiate between distinct characters.
- The Fix: Utilize the Kling o3 Reference-to-Video model. It supports up to 3 distinct
element_inputs(Characters/Objects). Upload 2 to 4 angles of each character (such as front-facing and side-profiles) to train the model's spatial memory. In your prompt, reference them explicitly as@Character1or@Character2to keep their movements completely independent.
Issue 3: "Text in my generated video looks garbled, or character hands are distorting"
- The Cause: Even with state-of-the-art 2026 engines like Kling 3.0 and Google Veo 3.1, diffusion models still face spatial-temporal limitations when rendering fine alphanumeric details or complex human anatomy (like fingers and hands) during active motion.
- The Fix: Avoid highly complex micro-motion prompts (e.g., "typing a password on a keyboard" or "playing a complex piano solo"). Instead, focus your prompts on broad, macro-movements (like "waving," "pointing," or "holding a cup"). If your video requires precise English text or subtitles, do not try to generate them with AI; generate the clean video first, then overlay crisp, vector text in post-production using a "Add Subtitles to Video" tool.
The Hybrid Workflow: Combining AI and Traditional Editing
For maximum engagement on platforms like YouTube Shorts, TikTok, or Instagram Reels, the most effective strategy is a hybrid workflow:
Step 1: Generate 4 distinct static concept images.
  ▼
Step 2: Upload them to Kling 3.0 FLF on imagevideoai.org.
  ▼
Step 3: Animate each with a subtle camera sweep and "Generate Audio: Yes".
  ▼
Step 4: Import the 4 resulting audio-synced clips into CapCut or Canva.
  ▼
Step 5: Apply a smooth transition between clips.
  ▼
Step 6: Sync the visual transitions to a trending music track.
(Tip: You can start this process directly using Kling AI Image to Video to generate your first motion clips.)
By animating the slides before compiling them, your final multi-image video transitions from a standard slideshow into a highly engaging, cinematic miniature film.
Frequently Asked Questions (FAQ)
What is the best AI tool to create video from images?
For cinematic multi-shot storytelling and native 4K output, Kling 3.0 is highly recommended. If you need highly fluid movement and character consistency, Bytedance's Seedance 2.0 is an exceptional alternative. You can test both models with various settings directly on the Image to Video AI Generator.
Do modern AI video generators support background music?
Yes. Instead of rendering a silent clip and adding audio later, tools like Wan 2.7 allow you to upload a WAV or MP3 right alongside your image. The AI will then sync the visual movement to the beat or rhythm of your track.
Can I control both the start and end of my AI video?
Yes, by using the First & Last Frame (FLF) generation feature. Supported by models like Seedance 2.0, Google Veo 3.1, and Kling 3.0, this option allows you to upload a starting image and an ending image, ensuring the AI-generated sequence begins and ends exactly how you designed.